DNS缓存服务器是一种不负责域名数据维护的DNS服务器。简单来说,缓存服务器就是把用户经常使用到的域名与IP地址的解析记录保存在主机本地,从而提升下次解析的效率,这次使用unbound这款软件部署缓存服务器
一、 准备工作
1、 实验拓扑
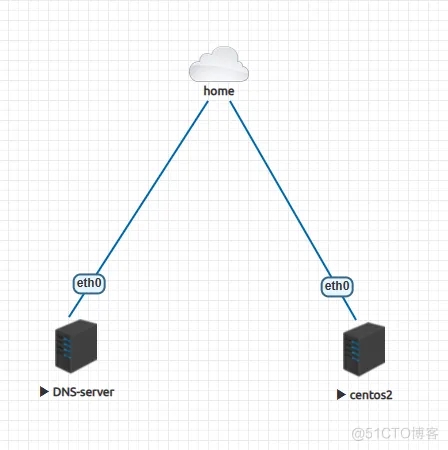
| 节点 | IP地址 | 说明 |
|---|---|---|
| DNS-server | 192.168.0.100 | 缓存服务器 |
| centos2 | 192.168.0.101 | 客户端 |
2、 unbound软件介绍
Unbound是红帽公司(RedHat)默认使用的的DNS服务包,Unbound是一个安全性高、功能强大、配置简单。
3、 使用参数说明
| 参数 | 说明 |
|---|---|
| interface | 监听ip |
| interface-automatic | 如果部署在非默认端口上,例如80/443,则需要禁用此选项 |
| access-control | 允许网段 |
| forward-zone | 允许域名,从哪里缓存 |
二、 ansible文件
1、 目录结构
[root@mmx_ansible dns_automating_unbound]# ls
ansible.cfg  inventory.yml  server.conf.j2  unbound.conf  unbound.yml
2、 配置文件
ansible.cfg
[defaults]
inventory=./inventory.yml
remote_user=root
3、主机清单文件
inventory.yml
home:
    caching_dns:
      ansible_host: 192.168.0.100
      ansible_ssh_password: "密码"
      ansible_user: "用户名"
4、 模板文件
server.conf.j2
{# 通过列举出所有的ipv4地址,来写 #}
server:
{% for ip in ansible_facts['all_ipv4_addresses'] %}
  interface: {{ ip }}
{% endfor %}
  interface-automatic: no
  access-control: {{ access_control }}
  domain-insecure: {{ domain_insecure }}
forward-zone:
  name: "{{ forward_zone_name }}"
  forward-addr: {{ forward_addr }}
5、 playbook
unbound.yml
---
- name: ubound is deployed on caching nameservers
 hosts: caching_dns
 become: yes
 vars:
  forward_addr: "114.114.114.114"
  access_control: "0.0.0.0/0 allow"
  domain_insecure: "*"
  forward_zone_name: "."
 tasks:
  - name: unbound is installed(安装软件包)
   yum:
    name: unbound
    state: present
  - name: unbound configuration is correct(配置unbound文件,当修改该文件时,重启服务)
   template:
    src: server.conf.j2
    dest: /etc/unbound/conf.d/server.conf
    owner: root
    group: unbound
    mode: '0644'
    setype: named_conf_t
   notify:
    - restart unbound
  - name: unbound is started and enabled(开启&&开机启动unbound服务)
   service:
    name: unbound
    state: started
    enabled: yes
  - name: unbound is started and enabled(确保防火墙开启)
   service:
    name: firewalld
    state: started
    enabled: yes
  - name: dns is enabled on the firewalld(放行unbound服务)
   ansible.posix.firewalld:
    service: dns
    state: enabled
    permanent: yes
    immediate: yes
 handlers:
   # 重启unbound服务
  - name: restart unbound
   service:
    name: unbound
    state: restarted
6、 执行playbook
ansible-playbook unbound.yml
[root@mmx_ansible dns_automating_unbound]# ansible-playbook unbound.yml
PLAY [ubound is deployed on caching nameservers] *************************************************************************************************************************************************************************************************
TASK [Gathering Facts] ***************************************************************************************************************************************************************************************************************************
ok: [caching_dns]
TASK [unbound is installed(安装软件包)] **********************************************************************************************************************************************************************************************************
ok: [caching_dns]
TASK [unbound configuration is correct(配置unbound文件,当修改该文件时,重启服务)] ***************************************************************************************************************************************************************
ok: [caching_dns]
TASK [unbound is started and enabled(开启&&开机启动unbound服务)] *********************************************************************************************************************************************************************************
ok: [caching_dns]
TASK [unbound is started and enabled(开启&&开机启动unbound服务)] *********************************************************************************************************************************************************************************
ok: [caching_dns]
TASK [dns is enabled on the firewalld(放行unbound服务)] ******************************************************************************************************************************************************************************************
ok: [caching_dns]
PLAY RECAP ***************************************************************************************************************************************************************************************************************************************
caching_dns        : ok=6  changed=0  unreachable=0  failed=0  skipped=0  rescued=0  ignored=0
三、测试
1、 客户端
1) 临时修改客户端DNS地址
[root@dns_client ~]# vim /etc/resolv.conf
nameserver 192.168.0.100
2) nslookup访问百度
[root@dns_client ~]# nslookup www.baidu.com
Server:     192.168.0.100
Address:    192.168.0.100#53
Non-authoritative answer:
www.baidu.com  canonical name = www.a.shifen.com.
Name:  www.a.shifen.com
Address: 182.61.200.7
Name:  www.a.shifen.com
Address: 182.61.200.6
2、 缓存服务器
1 ) 查看修改的配置文件
[root@DNS-Server_ubound ~]# cat /etc/unbound/conf.d/server.conf
server:
  interface: 192.168.0.100
  interface-automatic: no
  access-control: 0.0.0.0/0 allow
  domain-insecure: *
forward-zone:
  name: "."
  forward-addr: 114.114.114.114
2)查看缓存
unbound-control dump_cache
[root@DNS-Server_ubound ~]# unbound-control dump_cache
START_RRSET_CACHE
;rrset 155 1 0 2 3
a.shifen.com.   155     IN      SOA     ns1.a.shifen.com. baidu_dns_master.baidu.com. 2301200016 5 5 2592000 3600
;rrset 125 2 0 5 3
www.a.shifen.com.       125     IN      A       182.61.200.6
www.a.shifen.com.       125     IN      A       182.61.200.7
;rrset 545 1 0 5 3
www.baidu.com.  545     IN      CNAME   www.a.shifen.com.
END_RRSET_CACHE
START_MSG_CACHE
msg www.a.shifen.com. IN AAAA 33152 1 155 3 0 1 0
a.shifen.com. IN SOA 4
msg www.baidu.com. IN A 33152 1 125 3 2 0 0
www.baidu.com. IN CNAME 0
www.a.shifen.com. IN A 0
msg www.a.shifen.com. IN A 33152 1 125 0 1 0 0
www.a.shifen.com. IN A 0
END_MSG_CACHE
EOF
到此这篇关于ansible部署DNS缓存服务器的实现步骤的文章就介绍到这了,更多相关ansible部署DNS缓存服务器内容请搜索站长网以前的文章或继续浏览下面的相关文章希望大家以后多多支持站长网!
+1
赞
赏
 分享
分享